You may know these types of floors by other names. In addition to floating floor, it is also called laminate flooring; floating floor or laminate flooring, depending on where you are. The truth is, whatever you call them, we are talking about the same thing.
In short, floating floors are those that do not need to be nailed or glued to the floor. It may sound strange that a floor is not glued to its base; I imagine it is; but I assure you that it is perfectly possible. What’s more, its simplicity is one of the secrets why more and more people are seeking to know how to lay floating floors. If you have any doubts, it is one of the favorites of the “do it yourself”.
For any of the circumstances I have mentioned (or all at once!!) I have to tell you that you have arrived at the right place. I promise to tell you all the secrets of the professionals so that you know how to lay floating floors.
Laminate Installation: What You Need to Know Before You Begin
- How much floating floor do you need to buy
Although it may seem obvious, before installing a floating floor you should know how much you should buy. To do this, the first thing you need to do is to know the dimensions of the environment to be covered. There is nothing simpler than measuring the length and width of the room and multiplying both measurements to obtain the surface area.
- Types of laminate flooring
The market offers a wide range of floating floors of different appearances: PVC floating floor, waterproof laminate floor, laminate wood floor, or its varieties of natural wood, patinated, dyed, in light and dark colors, which can be adapted to any taste and decoration you decide for your home.
- Polyethylene blanket or wooden floor?
Before starting to lay laminate flooring on an existing floor (ceramic, granite, etc.) it is necessary to consider installing a polyethylene or self-leveling foam blanket. This film or sheet is about 2mm thick and serves to cushion the contact of the floating floor on the support base contributing to greater soundproofing. It will also serve to insulate the laminate floor from possible moisture condensation that could form between the original floor and the laminate floor.
Surface Preparation for Floating Floor Laying
We’ve already started, don’t despair. Let’s see what condition the bearing surface is in first. Remember that a large part of the success of the floor you’re going to lay will depend on that control.
- Check the status of the seat base
The floating floor can be installed over existing ceramic or mosaic floors. Any other finishing flooring, such as carpet, for example, must be removed.
The base for the floating floor installation must be even, free of unevenness (well or spine). Laminate flooring boards are of reduced thickness and may show signs of imperfection. This is why variations in the roughness of the subfloor must be filled in or worn out. The polyethylene blanket will help to conceal them but will not work wonders.
- Removing existing baseboards
If the installation base or the existing floor includes skirting boards, these must be removed so that the laminate floor reaches the internal walls (without touching them!!). Then the floating floor skirtings corresponding to the chosen model will be placed.
There are installation systems that allow you to avoid removing the existing skirting boards. The laminate floor is “pulled up” to almost touch them (leaving a gap of 1 cm), and the space is covered with a special moulding. While both methods work well, I particularly prefer to remove the installed ones so that you don’t see any overlap of materials that can be shocking.
- Pre-cleaning
After any repair work that may have been necessary,… there will be no choice but to clean up. It is best to sweep up thoroughly and finish the cleaning by vacuuming to remove any debris or dust that has been generated.
How to Install Floating Floor or Laminate Floor: Step by Step
You’ve come all this way looking to know how to install floating flooring, so let’s try to go through the necessary steps to do so. If you’re sure that the supporting surface is in good condition, have the tools and enough time, it’s time to start laying the laminate floor.
- Spread the polyethylene mantle
The first task before having a floating floor installed is to deploy the self-leveling foam over the existing floor. As it comes in rolls, it is convenient to overlap the seams (20cm) and tape them to act as a continuous membrane. It is important that the polyethylene blanket is laid over and “pulled up” a few centimeters over the wall to ensure a better sealing of the skirting board.
- Choose the direction of the boards
One of the simplest and most common questions before starting to lay a floating platform is “Which direction should the floating floor boards go?” My advice is to place the boards in parallel with the longest dimension of the room. If the room is square, the direction of laying is not clear. As for installing the floating floor at an angle, I sincerely advise against it. This wastes a lot of material in cuttings and complicates the installation.
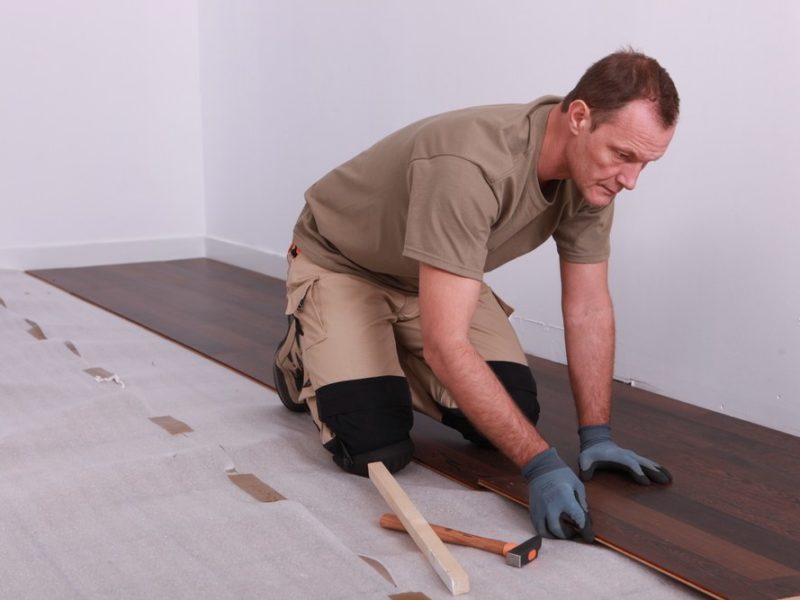
- Laying the first plank of the laminate floor
It is convenient to start installing the laminate floor from the wall opposite the entrance to the room. Another criterion used to lay floating flooring is to install the boards parallel to the light coming in through the main window of the room. The most advisable thing is to place a spacer of at least 8mm to separate the board from the wall, and place it with the groove facing the wall.
- Joining the boards
The plates are joined with a system commonly called click, without adhesives (tongue and groove system). The sides slide into each other at 45º and are locked when lowered and left flat. If you need to unlock them you must lift them at 90º. Learning how to install a floating platform successfully is a job that also requires practice done correctly. For example: how to avoid damaging the floating floor boards when laying them? It is simple.
- Finish the first row of laminate flooring
Cut the last piece of the row leaving a gap or separation (as mentioned) on its arrival at the wall to act as an expansion joint. For this you can use a dagger saw or a circular saw, according to the tools you have for installing laminate flooring.
You may have problems fitting the last piece on the floor because of the short distance to the wall. In these cases, try removing the second to last piece by placing the last piece in the row first. When you have done this, press it against the wall, place the second to last piece and hook the wood together.
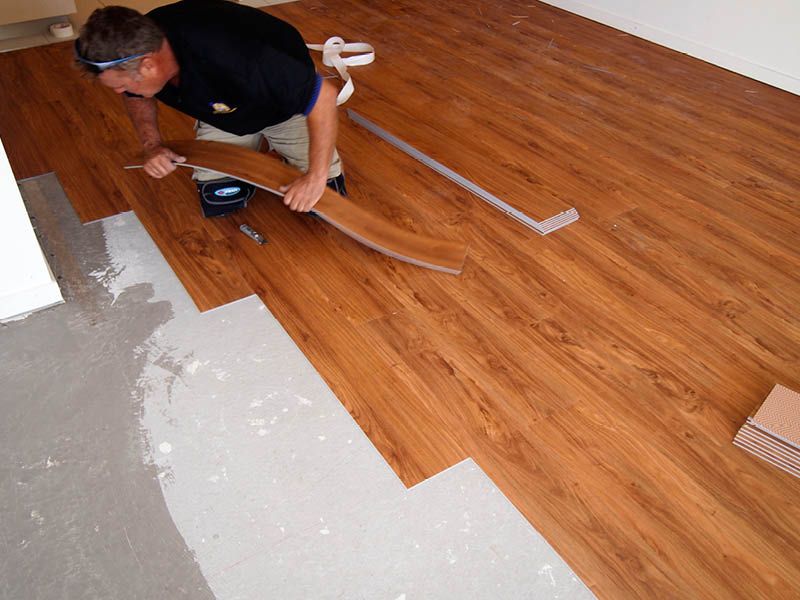
- Place the rest of the rows
To continue the installation of laminate flooring on the following boards, it is advisable to alternate the short wooden joints, so that they coincide with each other. This way you will ensure that they are not in the same line as the previous row.
This will help give the laminate floor more strength and make it look better. Use the protective block, wood or deadbolt hammer on the side of the piece to join the rows. From then on you just keep laying the floating floor boards, alternating the joints of all the rows until you have covered the room.
- Finish laying the floating floor
When you have covered the entire surface of the room, to finish the installation of the floating floor, make sure to remove the spacers from the edges of the walls. Cover the gaps between the wall and the floor (expansion joints) with wooden skirting boards or baseboards. This should be done along the entire perimeter of the room walls.